Thursday, 30 April 2009

No Project Updates

I know I owe you updates on the bathroom and the chicken coop projects, but I don't have them yet. The bathroom project has gotten put off in order to finish the chicken coop before the chickens get too big for their current residence. We've worked on it after work the last few evenings, but by the time we finished it was too dark to take pictures.

So, I thought I'd post a couple of pictures of the beautiful clematis that is blooming out by our mailbox. I planted this thing 3 years ago and this is the first year it has had more than 1 or 2 blooms. Isn't it beautiful! Only problem is that it is growing in a big cluster at the base of the mailbox rather than climbing like it is supposed too. Oh well, it is still beautiful, don't you think?


Monday, 27 April 2009

My Weekend In Pictures

Since the Easter Bunny brought me some new chick babies, we have to build them a place to live. They just can't go on staying in my living room, they are not good house guests. So, we chose a spot in the back of the house:

It's right next to the old chicken coop, so if we end up with roosters and need to separate them, we can put them in the older, smaller coop.

Then we started putting together the deck of the coop in the garage. It was over 90 degrees in there, so we worked as fast as we could.


Then we moved the framework to the new location. We attached one end to the lawn mower and lifted it up with a chain. My handy man put a concrete block on the furniture dolly and put it under the other end. My in-laws helped to keep it balanced and off we went.


We set it at the new site and got it all leveled up. That's the old coop on the left.

Put plywood on the top and a piece of sheet vinyl (for easier clean up),


And started framing it up.

That's about as much as we could get done this weekend. We hope to work on it some in the evenings this week. I'll keep you posted.

Thursday, 16 April 2009

Look What the Easter Bunny Brought to My House!

Six of the cutest, week old, Rhode Island Red chicks of unknown sex.

And six of the tiniest little bantam chicks you've ever seen. I haven't measured them, but I'd bet they are only about 1 1/2" tall, if that. I don't know what sex or breed these are, but I'll know when all of their feathers come in.

This one DH calls Number 1 because it is the only yellow one we got.


I call these two Baby Blue (George Strait Song) and Bonnie Blue (Gone With The Wind).

And then there are 2 like the one on the right, and this dark one. As you can see, they have feathers on their feet. Sooooooo cute!


Here is a picture of DH holding the little dark one.
All 12 are currently living in my living room in a dog kennel that we wrapped with chicken wire to keep them from getting out. We placed a heat lamp over the top to keep them warm until all of their feathers come in. I can't tell you how much time I've spent just watching them.
Now we have to build a bigger chicken coop and enclose a bigger run for them. Our other 5 hens have no idea their territory is getting ready to be invaded!

Tuesday, 31 March 2009

Just What I Always Wanted - Really!

For some CRAZY reason, I have always wanted an antique, claw foot tub. Most of the people I've told about this think I am NUTS! And I may be, but I have waited and waited and now I have one.

When we decided to remodel the "guest" bathroom, which will usually be used by me, I decided that I was going to find one come hell or high water! Yesterday I was searching on Craig'slist, one of my favorite junking sites, and found this beauty:

It was just what I wanted. It was a reasonable price and the interior is in great shape, it doesn't need to be re-glazed. That alone saves me major $$! I have priced some refurbished ones in some of my local shops and they were running $700 or more, just for the tub. Then I'd have to buy the faucets and all to go with it. So I've already saved more than $400!

Just a quick cleaning with some baking soda and a good polish with some paste wax for cars and the inside will be ready to go. The outside, on the other hand, will have to be stripped and repainted, but DH has promised to help me with it. I've found instructions on several websites and think it is a pretty straight forward process, but it will take more than one weekend to complete. The claw feet will also have to be stripped and either painted or plated. I'm probably opting for painting them. There are lots of good quality metallic spray paints that I can try. If they don't work or last, I can always have them plated.

The bonus, all of the hardware - faucets, etc. were included - even the overhead frame for the shower curtain!

As my kids say - I'M STOKED!

Monday, 23 March 2009

Hello Spring

We have lived in our current home for almost 7 years. Just off of the main street to our home is an abandoned business. Sometime in the past someone had the creative idea to plant daffodils so that everyone who passes can enjoy the hope of the upcoming season. As sometimes happens, flower bulbs either die off or become too deep set to bloom again. This is what has happened with this Spring message, but we still enjoy watching for it's message. I hope you enjoy it too!


Friday, 13 March 2009

Toile Tuesday

Pretty Organized Palace is hosting Toile Tuesday today. Here is my contribution to the party.

This is one of my grand-daughter's room. When my daughter was expecting her, my then 77 year old mother, my daughter and I had a Baby Room Workshop and put together these items for her room.

The valance for her window. No pattern. We just winged it.


Her diaper stacker. We used a pattern, but I couldn't find it in time to post it. The pattern didn't show the red trim that we put at the opening, but we thought it really added a little zing to the look.


We combined the toile, with black & white dots, a solid red and a solid white to make this Rail Fence quilt for her crib. Daughter uses a solid red crib sheet to pull out the red in the quilt.


Then we purchased these letters to spell out the baby's name and painted them to match. Her Daddy nailed the moulding "frame" to the wall above her crib and daughter put the baby's name inside. We used a pencil eraser dipped in white paint to add the dots and hot glued ribbon between the colors for a smoother transition. I've since found toile scrapbook paper and have thought about replacing the black & white dots with it, but I have so many other projects to do, it may not happen.

We found a nice curvy dresser on Craig'slist and painted it red. It is just the right height to use as a changing table.

And here is another toile project I've done recently.

Remember the book ends I was doing for my co-workers office?

Here is the before:

And the after:

It's amazing what a little black spray paint, some scrapbook paper and Mod Podge can do!

Wasn't this fun?!?! Now I'm off to find more things to do with toile. Don't forget to jump on over to Pretty Organized Palace and check out what all of the other crafty ladies have done.

"Guest" Bathroom Remodel Is Underway

We have been slowly getting back into our ever-on-going remodel. It was really hard to get too motivated during the winter months, but now that the weather is starting to warm up we are at it again. And yes, these are actually "during" pictures. You already know the story on the "befores".

This bathroom is only 9 ft. wide and about 11 feet long. Within the bathroom is the closet where our washer and dryer are located. When we were looking for a new house I told the realtor that I wanted my new house to have either a separate laundry room or a bathroom with the washer and dryer in it. In our previous house the closet for the washer and dryer was in the kitchen/dining room. I don't know who had that brilliant idea, but it didn't work for me. Nothing like dryer lint in the kitchen and piles of laundry on the dining room table!
So, I got my wish and the closet for the washer and dryer is in the "guest" bathroom.
Also located in this closet is the hot water heater. This means that on the end of the closet where the hot water heater is there was about 18" of space between the wall and the hot water heater. So, because I didn't have a linen closet (I was using a pine cupboard that was taking up a LOT of room) I had the idea to build one. So, while DH was not paying attention, I got his trusty "saws all" and went to work.

First I checked to make sure there were no pipes or electrical wiring running through the wall. Then I knocked a hole in the wall and cut out the drywall.


The I pulled out the stud in the middle of the opening.
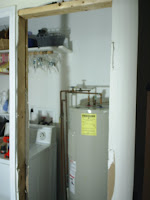

Then DH came in and saw what I was doing and asked me "What in the he double hockey sticks" I was doing NOW! OK, maybe he didn't say double hockey sticks, but I'm trying to keep this a "family" blog.

So, as he knew would happen, he had to get involved. He framed in the top of the opening that you see above and we went to Lowe's . . . where I told the guy in the kitchen department what I was doing and he became a great enabler. I told him I wanted 2 cabinets 12" deep. One to put on the top and one to put on the bottom. He explained that only upper cabinets are 12" deep, so he dug through the cabinets they had on the shelf and found me 2 "damaged" cabinets and marked them down to half price. (See, I told you he was a GOOD enabler!) The actual "damage" consisted of black marks on the doors of the oak front cabinets that he said rendered them unusable for someone who wanted to stain them. Well, I was going to paint them, so no problem. And home we went with 2 oak front upper cabinets for less than $100.


I am using beaded board in this bathroom, so we took the back off of the upper cabinet and removed the door. We cut a piece of beaded board that was left over from the bedroom we did for our granddaughters and added it to the back of the cabinet. He took the door to the garage and cut out the center panel. We are going to put glass in it instead. Then we installed the cabinets in the opening, one above the other. There is 17" of space between them, which we filled in with another piece of beaded board. We will add a "counter top" to the top of the bottom shelf and I will add some decorative touches.


It will all be painted white and trim will be added around the opening to complete the installation. I'll post those pictures when that part is done.


DH got busy yesterday and did this:


And pulled this away from the wall:


Two happy Freecycler's are coming to claim them tonight. I know, I know, I could have re-purposed the vanity, but sometimes it's best just to move something on to someone else.

A re-purposed dresser will become the new vanity and I'm looking for a great deal on an old one of these to replace the tub:


Come back in a few days and check out how much we get done.